Integration Services, which replaces Data Transformation Services (DTS) in SQL Server 2005, is a wonderful tool for extracting, transforming, and loading data. Common uses for Integration Services include: loading data into the database; changing data into to or out from your relational database structures; loading your data warehouse data; and taking data out of your database and moving it to other databases or types of storage. This article describes how you can use the new features of SQL Server 2005 Integration Services (SSIS) to load an Excel file into your database.
Note: There are several wizards that come with SQL Server Management Studio to aid you in the import and export of data into and out of your database. I will not look at those wizards; I will focus on how you can build a package from scratch so that you don’t have to rely on the wizards.To begin the process, I open SQL Server Business Intelligence (BI) Development Studio, a front-end tool that is installed when you install SQL Server 2005. The BI Development Studio is a scaled down version of Visual Studio. Then I select New Integration Services Project and give the project a name. See image 1.
Image1:

When the project opens, you will see an environment that may look familiar to you if you have used SQL Server DTS; some of the items of the toolbox are the same. For the purposes of this project, I am interested in dragging the Data Flow task item from the toolbar into the Control Flow tab. (The idea of a Data Flow task is one of the major differences between DTS and SSIS packages. In an SSIS package, you can control the manner in which your package logic flows inside of the Control Flow tab. When you need to manage the data aspects of your project, you will use the Data Flow task. You can have several different Data Flow tasks in your project — all of which will reside inside the Control Flow tab.) See image 2.
image 2.

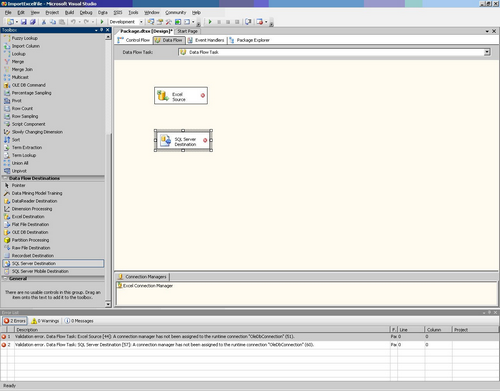
Double-click the Data Flow task that you have dragged onto the Control Flow tab. The available options in the Toolbar have changed; I now have available Data Flow Sources, Data Flow Destinations, and Data Flow Transformations. Since I am going to import an Excel file into the database, I will drag the Excel Source item from the Toolbar onto the screen. See image 3.
image 3

The Excel Source item represents an Excel file that I will import from somewhere on my network. Now I need somewhere to put the data. Since my plan is to put the data into the database, I will need a Data Flow Destination. For the purposes of this example, I will choose SQL Server Destination from the Data Flow Destination portion of the toolbar and drag it onto my Data Flow tab. See image 4.
image 4
To designate which Excel file I want to import, I double-click the Excel Source item that I moved onto the screen. From there, I find the Excel file on the network that I want to import. See image5.
image5

I also need to designate the sheet from the Excel file that I want to import, along with the columns from the sheet that I want to use. image 6 and 7 depict these options.
image 6
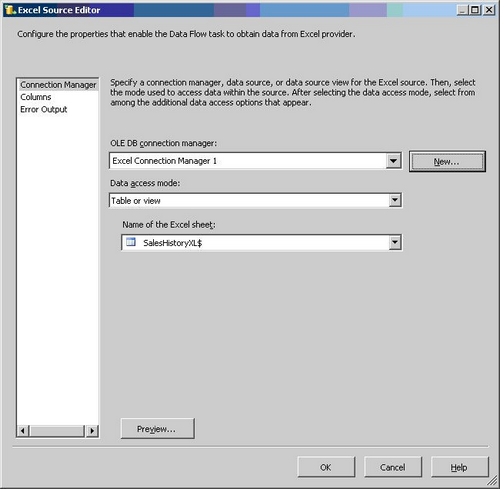
image 7

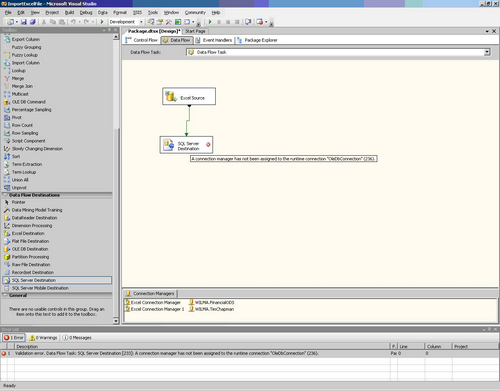
Now that I have defined my Excel source, I need to define my SQL Server destination. Before doing that, I need to indicate the Data Flow Path from the Excel file to the SQL Server destination; this will allow me to use the structure of the data defined in the Excel Source to model my SQL Server table that I will import the data into. To do this, I click the Excel Source item and drag the green arrow onto the SQL Server Destination item. See image 8.
image 8
To define the database server and database to import the data, double-click the SQL Server Destination item. I will define the server in which I will import the data, along with the database that the data will reside. See image 9.
image 9

I also need to define the table that I will insert the Excel data into. I will create a new table named SalesHistoryExcelData. See image 10.
image 10

Under the Mappings section, I define the relationship between the Input Columns (the Excel data) and the Destination Columns (my new SQL Server table). See image 11.
image 11

Once I successfully define the inputs and outputs, my screen will look like the one below. All I need to do now is run the package and import the data into the new table by clicking the green arrow in the top-middle of the screen, which executes my package. See image 12.
image 12

Image 13 shows that my package has successfully executed and that 30,000 records from my Excel Source item have been transferred to my SQL Server destination.
image 13

Sample Excel file is image14